Got a requirements document to write for WebRTC? Here’s a step by step guide to doing just that.

Here is something that I do with my customers quite often. In many cases, when I consult vendors, they are in the process of building a new product or integrating an existing product with some new communication capabilities. This involves using WebRTC and outsourcing the actual development.
More often than not, I find myself writing the baseline of the requirements document for the customer, to server as a WebRTC RFP (Request For Proposals) that get used to communicate the requirements with the potential outsourcing vendors.
I wanted to share the process that I use in writing the first draft of this document. To make this a bit more useful, let’s assume that what we want to do is build a webinars service, where a few people can join as the speakers in the webinar and people online can “listen in”.
I’ve created a WebRTC requirements template and a sample webinars requirements document that you can use when you need to write the requirements for your own product.
Here’s step by step how I’d go about doing that.
Step #1: Structure your document
First things first. To make sure I don’t forget anything, I like to split my requirements document into 4 sections:
- Overview
- Architecture
- Functional
- Non-functional
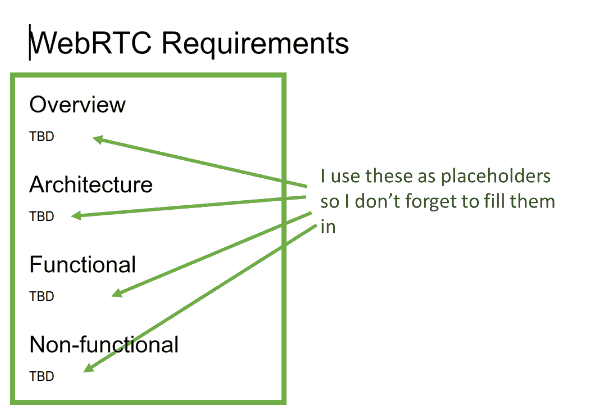
As you can see in above, I place TBD for each section in the document. I do that for all sub sections that I add to the document as well. This way, I can easily search the areas that haven’t been filled in properly yet when I work on it. Most often than not, writing these WebRTC requirements take a couple of hours and span a few days because they are collaborative in nature.
I tend to leave out the mechanics around the project – such as the price model I am looking for, or the timeline of the project. These tend to change between companies and they often better reflected elsewhere than in the technical requirements that I try to describe here.
Step #2: Write the overview
First thing I do once I have the template ready for my needs is write the overview part.
I try to keep the overview short and sweet, with a focus on making sure people understand what it is that I am trying to achieve in the service – what my challenges are and what I consider as success.
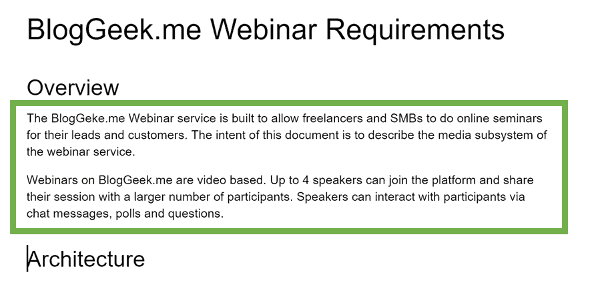
Usually, 2-3 paragraphs should be enough.
Step #3: Describe the architecture
Now it is time to start thinking about our architecture. By that, I don’t mean the architecture of the solution, what processes, servers and switches I want – I leave that for the vendor to fill in. What I mean is the entities I have in my service, trying to focus around the session – the types of media and signaling I want running there.
I do this by going analog, and just jot it down on my whiteboard and taking a picture of the end result. I find this more natural for me than using Powerpoint or Vizio. Later on, I might redo it as a Powerpoint diagram, but more often than not, I just leave it as is.
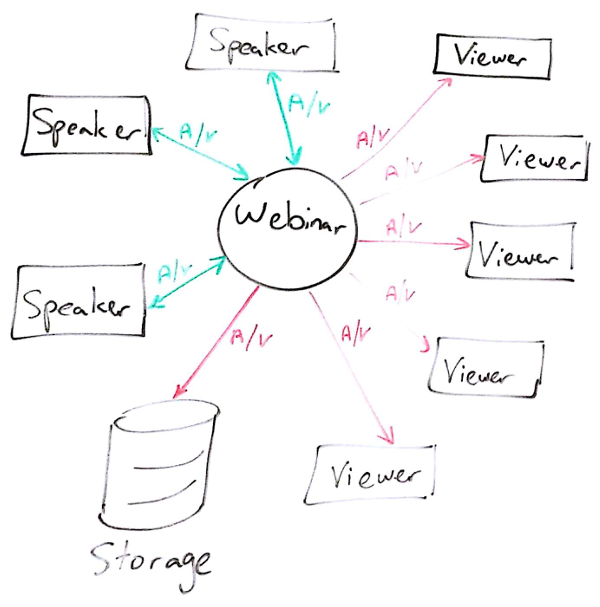
Above is the drawing I just did to describe the BlogGeek.me Webinar I just invented.
After the visual, I explain the different entities that are in the drawing and the relations between them. This part is really important, as oftentimes, it will reveal entities or flows that I haven’t thought about earlier.
In the case of the BlogGeek.me Webinar, we’ve got multiple potential Speakers who interact using audio and video with each other in the Webinar, which then gets sent to multiple Viewers and also to an external Storage.
I try to keep things focused and to the bare minimum that is necessary for the understanding of the service.
Step #4: Fill in the features
To some extent, this step is the main chunk of what the product does. For me, this is a brain dump of the things a user should be able to do in the system.
There are different types of features you might be needing. I focus on those that relate to the communication part of the product and nothing else.
Here’s a checklist of what I usually go through when doing this:
- Is this a 1:1 service or multiparty?
- Audio? Video?
- Any screen sharing or other collaboration capabilities?
- Messaging/chat?
- How do users get authorized, authenticated and connected?
- Any in-session controls users need to have?
- Any indicators to show on their display?
- Do we need recording capabilities?
- Anything that we missed?
Make sure you answer all the questions above as requirements in the document if they make sense and add your own to the list.
Here are a few of the ones I’ve written for the webinars product:
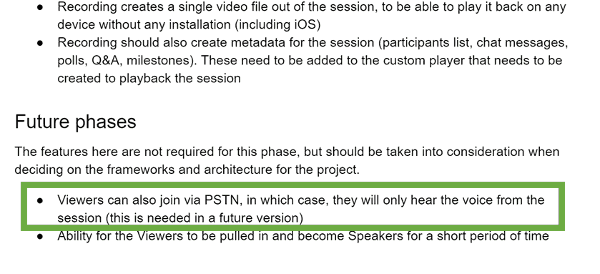
Notice how I’ve indicated that connectivity via PSTN is optional in a future phase? This serves two purposes for me:
- It gives the vendor a hint of what architecture to put in place to support this later on down the road
- It also gives the vendor a feeling that this is a journey and not a one-off project. He will be more committed to its success if he knows you might call on him later on to improve and extend the service
Step #5: Handle the non-functional requirements
Now it is time to go over the non-functional requirements. These are the boring and ugly details that can make or break a service, so spend enough time on this one.
What do I mean by non-functional? These will usually be things you will take for granted, but the vendor won’t. To reduce friction and arguments in the future, I add these. In most likelihood, if you don’t write these down, a vendor will ask about a few of these things anyway – so just write them down to reduce the unnecessary round trips and to make sure you and the vendor are on the same page.
I tend to split this section to 5 subsections, each with its own focus:
1. Devices
Here I list all the devices I want to support. Browsers, operating systems, mobile devices, etc.
Each gets its own special treatment. Things I usually look at here are:
- Which browsers to support natively?
- Do I need an Electron PC app? If I do, then on which operating systems?
- What versions of iOS to support? Which earliest devices?
- What versions of Android API to support? How many specific devices do I want tested?
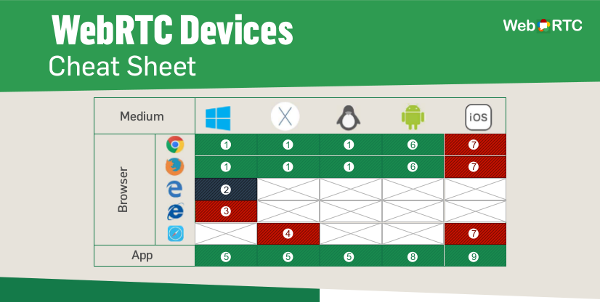
In many ways, I derive the requirements here based on the WebRTC Device Cheat Sheet that I published.
2. NAT traversal
NAT traversal is often overlooked. There are two areas where I cover NAT traversal – here and in the Security subsection below.
Here, I define who takes care of it – do I expect the vendor to bring a NAT traversal solution, will I be doing it, or should they use a third party hosted service (there are a few out there offering it).
The second part that I sometimes decide here, but not always, is where I want it deployed – along with the media servers or closer to the connecting user. It is a matter of architecture needs that I prefer leaving to the vendor to fill in but not always (can’t really say when in a definitive way).
In my webinar example, I decided to make things easy and just use a third-party hosting service:

3. Scalability
For scalability I make sure I cover a few areas:
- What’s the scale of a single session? Just make sure that if there are different types of users, you indicate how each can scale
- What’s the scale of the service as a whole? How many sessions can exist concurrently?
- Do I need to address any geographical locations when it comes to scaling?
- How are the different parts of the systems scale? Independently of each other?
Here’s how I fit it into our webinar example:

4. Security
The security part is slightly tricky. First, because I am not an expert. But also because almost nobody is.
What I usually place here is the basics of how I’d like to see the backend (encryption between the servers), but I do cover two important areas:
- Media servers. I prefer access to them to be limited to the application server only when it comes to control and have all signaling be routed through the application server or a signaling server. I don’t like giving access to my resource hog openly over the internet. Call me old fashioned
- TURN servers. Here I always state that I want ephemeral passwords. Otherwise, vendors usually do the short route of using a static username and password, which in WebRTC is like no password at all on the TURN server
5. DevOps
The DevOps section deals with things required to run this product on a daily basis. I tend to fill in three main things here:
- Hosting – is this planned to be deployed on premise? In a specific cloud provider? Using Docker or some other container technology?
- Reporting – what type of information do you want to collect to generate reports on the use of the system? These should be for offline use – think a daily email or something similar
- Events and statistics collection – this is what you want to be able to collect to monitor the health of the service in realtime
Step #6: Do a one-over and share
Now that we’ve written t all, time to go over the whole document to make sure things aren’t missing:
- Clean up any leftover TBDs
- Add clarifications where necessary
- Add things not in the template
Here’s what I decided to add to the webinar example:
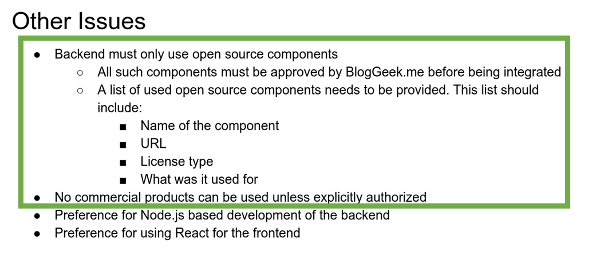
As you can see, for me, open source was really important.
Now that you are done – go share the document with your colleagues, and once approved internally, it is time to share with potential outsourcing vendors.
Why so short?
To some, this approach may seem a bit shallow. It doesn’t include all corner cases or describe in a lot of detail what goes on. The thing is, that there is a balance between what you can effectively do and achieve as a small startup or even a big company with a new project than what you’d do on a long running multi-year millions of dollars project.
For me, this proves itself as a good way to capture the essence of what it is that needs to be developed and getting replies from potential vendors to building the product. Once I get the replies, it is time to go over them and see who makes the most sense – a lot based on how they replied to the RFP in the first place.
What’s next?
So here’s how you should write your next WebRTC requirements document:
Step #1: Structure the document to make sure all bases are covered
Step #2: Focus on the overview – explain what your product needs to achieve
Step #3: Draw the architecture and explain it
Step #4: Write down your functional requirements
Step #5: Write down all non-functional requirements
Step #6: Do a one-over to make sure you didn’t miss anything
I’ve built a WebRTC Requirements Template document for you. You can copy it and fill it in with the requirements of your own product. It already holds many of the questions you’ll need to answer, so it can serve as a guide for you.
Now, to write this article, I also had to create a real-world example (remember our webinar service?). This example is also shared so you can see how I write things down.
Oh, and if you still need help – I do offer a consulting service, where a lot of the time invested is placed into writing these requirements documents, finding suitable potential vendors and going over their responses.


Very usefull article – For us “youngsters” is this structure little bit oldfashioned. We started to use user stories when we are about describing any new project. We try to describe step by step user actions in various situations step by step – adding granularity and complexity as the analysis is in progress. This is extremely helpful later by designing GUI, developing user roles, system detailed behavior description etc. And the rest can remain as Tsahi described – and the final document you can seamlessly pass to IT analytics and programmers to create new awesome system 🙂
Thanks for the tip Jaro.
User stories are indeed in fashion for a few years now, though I myself was never really fond of them (I hate writing these). This is probably because I usually capture the whole service in my mind and then break it down to its technical pieces. And yes – adding them does help in reducing miscommunication.
Great write up. Thanks for posting!